Saturday, May 17, 2025

First Light with the Askar FMA180 Pro

 It was a good night to shake down a new setup ...

The forecast for Saturday night 5/10 was for intermittent clouds early on and clear skies after midnight. this forecast, coupled with the fact that there was a very bright 96% illuminated Moon up almost the entire night, made it easy to decide to shake down my Askar FMA180 Pro (click here to view a post about building this rig). The goal was to get everything working, an imaging would be a bonus. 

The process started well before dark. It began when the Askar FRA600 (on loan from a friend) was removed from the mount. I took the Pegasus Astro Pocket Powerbox Advance off the Askar FRA600 rings and installed it on the Losmandy Dovetail Rail that the Askar FMA180 Pro was installed on. I have three gutter spikes in the ground where I set up my mount for imaging. The mount was leveled, then the Askar FMA180 Pro rig was installed on the mount and connected all the cables (performing some cable management to tame the mess of cables). I connected everything to my laptop and verified that all the devices could connect to NINA, adjusting COM port settings as required. The telescope was then slewed to point at the tree line across the street so the Guide Scope and the Imaging Scope could be roughly focused. I also created the PHD2 profile for this setup and took darks for the guide camera. The mount was parked and covered with a tarp. 

At dusk, I came back out and uncovered the scope. The first order of business was to properly focus the Guide Scope. I used SharpCap to do this. Once focused, the mount was polar aligned. SharpCap was used for this too. The Guide Camera was disconnected from SharpCap and was reconnected to PHD2. Using the Calibration Assistant Tool, the mount was slewed to 0 declination and about 5 degrees from the Meridian. After calibration was completed, I ran the Guiding Assistant for 15 minutes and applied the recommended changes to the guiding settings. The Imaging Scope was focused by eye. I worked on multiple autofocus runs in NINA to optimize the autofocus settings. After getting the autofocus set up, I verified plate solving worked. So far so good. Dodged a few clouds here and there but everything progressed smoothly. So now what?

I started to search for imaging targets that would be a good fit for this wide field rig. The best option was IC 1396, The Elephant Trunk Nebula. I have imaged this target before with my 80 mm Refractor at 480 mm of focal length (click here to view the previous result for IC 1396). Unfortunately, this target did not clear the tree line until about 1:30 AM. Since this was the first weekend with nice weather this spring, we did a lot of yard work during the day and I did not want to stay up all night. Then it hit me, maybe this was the time to finally try the (Advanced) Sequencer in NINA. I had already download templates from Patriot Astro, but never had a need to try this functionality out. I modified the OSC template for my setup and did a quick test. It worked perfectly. I loaded in a Sequence to image IC1396 starting at 1:30 AM until about 4:45 AM.  Again, it worked perfectly! I woke up the next morning and the scope was parked, the camera warmed, and 55 subs were saved to the laptop's hard drive. I was worried the subs would be of poor quality due to the 96% illuminated Moon but was pleasantly surprised after processing the image. Having said that, if the opportunity presents itself to add more exposure time to this, I will! 

Here's the resulting image :

IC 1396 - The Elephant Trunk Nebula - first light with the Askar FMA180 Pro.

Processing:

All pre and post processing was performed in PixInsight. Pre-Processing: All subs were visually inspected with Blink and subs with issues were removed. All light Frames, Flats, Darks and Dark flats were loaded into WBPP. Linear Post Processing: Background extraction was performed with GraXpert followed by BXT (correct only). SPCC was used for Color Calibration followed by a full application of BXT. The Stars were removed using StarXT. Starless Linear: Noise was reduced with NXT. The image was made non-linear with HT. Linear Stars: The stars were made non-linear with Seti Astro's Star Stretch Script.

Non-linear Post ProcessingStarless: The Narrowband normalization Process was used to get the "SHO" look. Color, intensity, and contrast were adjusted with various applications of CT. Saturation was increased with CT. The Image blend Script was used to sharpen the image with a High Pass Filter. LHE was applied at 2 Kernel sizes an the Unsharp mask was applied. The DSE script was used to enhance dark nebula regions. Stars: Saturation was increased with CT. SCNR was applied and the Correct Magenta Stars Script was used to help with stars captured with a dual narrowband filter. CT was used to adjust contrast one last time. Final: The Stars and Starless images were combined with Pixel Math to produce the final image. 

What is it?

IC 1396 is a region of ionized interstellar gas and dust that contains smaller regions of concentrated gas and dust that appear as dark knots or globules in visible light images. The gas in the entire region is being ionized by the bright star HD 206267 in the center of the image. The Elephant Trunk Nebula is one of those concentrations of gas and dust. It can be seen rising from the bottom of the image. These areas of concentrated gas and dust, including The Elephant Trunk, are star forming regions. Young stars within The Elephant Trunk were discovered in 2003 using infrared telescopes.

An annotated image of IC1396

How Big is it?

IC1396 has a size of 170 x 140 arcminutes (1 degree is 60 arcminutes) on the night sky and is about 100 light years across.

How Far is it?

IC 1396 is located about 2,400 light-years (ly) in the Constellation Cepheus.

How to find it?

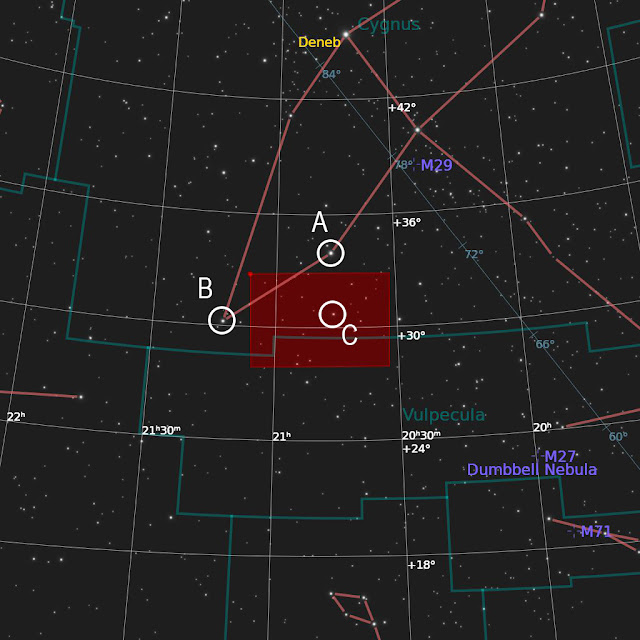
The constellation Cepheus is located near the bright signpost constellation Cassiopeia. Cepheus is a circumpolar constellation for observers at mid-northern latitudes and above. This means the constellation never sets. It is visible all night, appearing to circle the north celestial pole currently located near the North star, Polaris. to me, this constellation looks like a house with a disproportionately large roof. IC 1396 is indicated in the chart by the red rectangle just off what would be the ground floor of the house. 

Finder Chart for IC1396


Image Details:

Capture Date: 5/11//2025
Location: Eden, NY
Telescope: Askar FMA180 Pro
Camera: ZWO ASI2600MC Pro
Filter: Optolong L-eXtreme
Mount: Sky-Watcher USA EQ6-R Pro
Exposure: 55 exposures at 180 sec / Gain 100 / Offset 50 / -10°C each for a total exposure of almost 2 hours and 45 minutes.
Software: NINA, SharpCap Pro, PHD2, and PixInsight


Clear Skies!
Ernie


M82 from the BMO - Group Capture / Group Process

 Some processing fun on a very soggy Astronomy Day ...

Saturday May 5th was Astronomy Day. Our club had a busy day scheduled. We were going to open the observatory from 12 to 5 pm for Solar Observing and various other activities. A small group was leading a group of local Girl Scouts through a badge workshop. Finally, we had our monthly Public Night event. Mother Nature had other plans. We canceled the 12 to 5 pm Astronomy Day event due to persistent rain all day. We did use the time to clean and organize the observatory. The Girl Scout badge workshop went on as planned (just no observing) and we never cancel Public Night. We had one visitor, and I think that person was a friend of a member. 

One of the members of our club's imaging special interest group (The Tuesday Night Imagers) had collected data on M82 on Sunday 4/27 with our club's telescopes. She collected data with both the Celeston 14" Edge HD and the Tele Vue NP101is. Collecting data with only a UV/IR filter and some data with a Dual Narrowband filter. I copied the data from the 14" telescope to my portable hard drive and transferred it to my laptop. I had joined via Zoom and a few other members participated, but had to leave early. I fired up PixInsight and started processing it. I connected my laptop to one of our large screen TV's and we worked on the data as a group. I drove but many of the choices made during the processing came from the other members that participated. In particular one of our members who is an experienced astrophotographer and a meteorite hunter/collector. It was a lot of fun, and the resulting image is undoubtedly different from what I would have come up without their input. Here's the resulting image. 

M82 from the BMO on 4/27/2025 - Group process

Processing:

I'm going to keep this pretty high level. too much time has elapsed for me to accurately describe all the steps we used. Basically, data from both the UV/IR Cut filter and the Dual Narrowband filter was loaded into WBPP with all calibration frames and pre-processed. This resulted in two master light frames that were registered to one another. Both master lights were processed up through making them non-linear. We then split a clone of the Dual Narrowband data into separate channels (R, G, & B). We treated the R channel as Ha and added it to the UV/IR data. We also fully processed the unsplit Dual Narrowband data. Ultimately, we blended both images together with the image blend script. 

What is it?

Messier 82 (M82) is also known as The Cigar Galaxy. M82 is an example of a peculiar galaxy. It is also a starburst galaxy. It had a relatively recent (astronomically speaking) encounter with its neighbor, M81. M82 has been disturbed as a result of this encounter. We can see this in the dust lanes and heavy star formation.  

An annotated image of M82

How Big is it?

M82 has a size of 11.2 x 4.3 arcminutes (1 degree is 60 arcminutes) on the night sky. It is about 40,200 light years in diameter.

How Far is it?

M82 is located about 12 million light-years (ly) from Earth.

How to find it?

M82 is a popular target or visual astronomers and astrophotographers. For visual observation, larger aperture, a night with no moon, and dark skies always help for galaxies. I would recommend a low power (wide field if view) eyepiece. With my 24 mm Tele Vue Panoptic and my 8" f/6 Dob, I can get both M81 & M82 in the same field of view. Ust eh following steps to find M82 (and M81):

  1. Find the Big Dipper.
  2. find the Bowl Stars Phecda & Dubhe (Note: Phecda is the Star where M109 is indicated in the finder chart below)
  3. Draw an imaginary line from Phecda to Dubhe
  4. Extend the line through Dubhe roughly the same distance as the Phecda/Dubhe line
  5. M81 & M82 should be in your eyepiece or an optical finder scope

Finder Chart for M82

Image Details:

Capture Date: 04/27/2025
Location: North Java, NY (Buffalo Astronomical Association's Beaver Meadow Observatory)
Telescope: Celestron 14" Edge HD w/0.7x Reducer
Camera: OGMA AP26CC
Filter: OGMA 2" UV/IR Cut & Antlia 5 nm Alp-T Dual Narrowband
Mount: Astro Physics AP1200 Mount
Exposure: UV/IR Cut: 18 exposures at 300 sec / Gain 100 / Offset 100 / -10° C each for a total exposure of 1 hour 30 minutes. Alp-T: 10 exposures at 600 sec / Gain 100 / Offset 100 / -10° C each for a total exposure of 1 hour 40 minutes. Combined: 3 hours 10 minutes
Software: NINA, PHD2, and PixInsight


Clear Skies!
Ernie

Thursday, May 8, 2025

M109 captured on 4/23/2025 from the BMO

 Another clear night ...

The forecast for Wednesday April 23rd was promising. Therefore, our club's observatory directory decided Wednesday would be our imaging special interest group's session for the week that night. I could not attend as I had work meetings that night. However, I was able to join the group via Zoom and contribute to the night's imaging efforts while still attending to my work commitments. T skies were not the best but clear enough to image. With no Moon until four in the morning, we decided to go after a broadband target like a galaxy. I wanted to go after M64, The Black Eye Galaxy. Another member of the group suggested M109, a Barred Spiral Galaxy in Ursa Major. They made a better case than I did, and the group decided on M109. I'm glad they did. It is a very beautiful target.

After solving the usual array of issues that come with operating the observatory so infrequently, we began imaging at 9:24 PM and imaged until 10:54 PM. We captured data with both the NP101is and ZWO ASI2600MC-Pro system and the Celestron 14" Edge HD w/0.7x Reducer and the OGMA AP26CC system. I only worked on the data from the 14" telescope. With the combination of the 14" telescope and the OGMA AP26CC camera, we have settled on 300 sec subs for broadband imaging with the UV/IR cut filter, assuming sky conditions allow for it. If the Moon were up, we would most likely have to reduce exposure time. This target is framed very well with this telescope/camera combination. Here's the resulting processed image:

M109 from the BMO on 4/23/2025.

Processing:

All pre and post processing was performed in PixInsight. Pre-Processing: All light Frames, Flats, Darks and Dark flats were loaded into WBPP. After processing the resulting Master Light Frames, Satellite trails were visible. I blinked the individual subs and found 3 of the 16 subs had very bright satellite trails. I opened the 3 raw frames with the trails and used Seti Astro's Blemish Blaster script to remove the trails. The trails were reduced in intensity but could still be seen. I saved the 3 frames and then re-ran WBPP with more aggressive settings for rejection (reducing the High sigma in Winsorized Sigma Clipping from 3 to 2 and enabling Large Scale Pixel Rejection at a sigma of 2).  Linear Post Processing: Background extraction was performed with GraXpert followed by BXT (correct only). SPCC was used for Color Calibration followed by a full application of BXT. The Stars were removed using StarXT. Starless Linear: Noise was reduced with NXT. The image was made non-linear with HT. Starless Non-linear Post Processing: Saturation and intensity were increased with CT. Exponential Transformation was used to increase intensity. The Create HDR Image script was used to compress the core of the galaxies (mask was used). The Image Blend script was used (with high pass filter) to increase sharpness. LHE was applied at two different kernel radii and Unsharp Mask was applied (lightly). Stars Linear: The Stars image was made non-linear with Seti Astro's Star Stretch script. Stars Non-Linear: Saturation was increased with CT. Starless: Intensity, and contrast were adjusted with various applications of CT. The Stars and Starless images were combined with Pixel Math to produce the final image

What is it?

Messier 109 (M109) is a barred spiral galaxy in the constellation Ursa Major. Scientists believe our galaxy, The Milky Way, is a barred spiral galaxy. 

An annotated version of the M109 image.

How Big is it?

M109 has a size of 7.5 x 4.4 arcminutes (1 degree is 60 arcminutes) on the night sky. It is about 177,000 light years in diameter.

How Far is it?

M109 is located about 81 million light-years (ly) from Earth.

How to find it?

M109 is located in the constellation Ursa Major as shown by the small red square in the Finder Chart below. The galaxy is located about 40' southeast of Phecda, one of the bowl stars in the big dipper asterism. Dark skies and large aperture are helpful in viewing this galaxy.

Finder chart for M109.

Image Details:

Capture Date: 04/23/2025
Location: North Java, NY (Buffalo Astronomical Association's Beaver Meadow Observatory)
Telescope: Celestron 14" Edge HD w/0.7x Reducer
Camera: OGMA AP26CC
Filter: OGMA 2" UV/IR Cut
Mount: Astro Physics AP1200 Mount
Exposure: 16 exposures at 300 sec / Gain 100 / Offset 100 / -10° C each for a total exposure of 1 hour 20 minutes.
Software: NINA, PHD2, and PixInsight


Clear Skies!
Ernie

Saturday, April 26, 2025

A Trio in Leo and a Bright Asteroid too!!

 Where Science and Art Intersect ...

Please excuse this deep dive into my personal motivations for astrophotography. It is important to understanding why I'm so excited by this image and its contents. 

I came to astrophotography as a visual astronomer. I got into visual astronomy due to my deep interest in science. I've had this deep interest in science most of my life. I've never been an artistically minded person (although both my parents had artistic talents). I have been involved in astronomy outreach for many years; and I get great satisfaction from sharing the cosmos with our community. Once smart devices (smartphones and tablets) started to become common place, I tried to use them as another way to share the experience at my telescope with more people. This is what lead me down the path of astrophotography. Joining the Buffalo Astronomical Association (BAA) specifically to learn how to take better pictures of space and to get access to better instruments. Somewhere along the way, this became a creative or artistic outlet that I wasn't consciously looking for. To be 100% clear, the pictures I take of space are "pretty pictures". A lot of effort is placed on enhancing the data to optimize it aesthetically (color, sharpness, contrast etc.). The Science is still an underlaying foundation, that never goes away, and is a fundamental part of the experience for me. For me, astrophotography is at the intersection of Science and Art, both make an essential contribution to the experience. 

The forecast for Tuesday April 22nd improved to indicate clear skies for most of the night. A trip to our club's observatory was not in the cards for a work night. After work, I came home and set up my rig. I had not imaged from home since October. I had to rebalance the telescope on the mount, as it had been removed during the intervening time. Setting up took a little longer than usual but was completed without any issues. Once it was dark enough, the telescope was polar aligned, calibration in PHD2 guiding software was performed, and the focus of the main telescope was confirmed, allowing for successful plate solving and autofocus routines. The target for the night was already determined to be the Leo Triplet. There was no Moon until early in the morning, Leo is well placed in the sky for many hours of imaging, and I liked the framing with the Askar FRA600 (still on loan from my friend) and the ZWO ASI2600MC Pro. I loaded the sequence that I created in advance and hit play. Everything went smoothly and I imaged until about 10:30 PM when at the Meridian. I did not take flats at start up as I knew the camera had to be rotated to get the framing I wanted. So, I came out at Meridian Flip and took my flats. Once completed, I resumed the sequence and went inside to go to sleep. I knew I would lose the target some time between 2:30 to 3 am. The sequence was set to stop capturing images around 2:50 am, park the scope, and warm the camera sensor. I got up the next morning and put my rig into the shed before work, putting everything away properly after work. I collected 150 2-minute exposures. The last 20 were in the trees. After viewing the exposures with Blink in PixInsight, I ended up with 126 usable exposures. This is the resulting image:


This image of The Leo Triplet was captured on 4/22/2025 from my backyard.

Now the exciting part (at least for me):

After processing the image, I noticed a faint streaked smudge. Having experience processing comets, I recognized that something had moved relative to the stars. When we stack an image with a comet with the image registered to the stars, we get a very similar artifact. See the images below to get a better view of the artifact and to see where in the image it is located. The first image below has two rectangles. The small rectangle was drawn around the area in the image containing the smudge/streak. The large rectangle is an Insert with a 2X magnification of the area is in the small rectangle. This was inserted with Seti Astro's Astromark signature and Insert Adder script in PixInsight. The arrow indicates the location of the smudge/streak. The second image is a crop of the insert.

My initial thought was that it must be an asteroid, and a bright asteroid too!! Now to confirm and identify the asteroid. The first step was to plate solve the image. PixInsight compares the stars in the image to a database and precisely determines the location. PixInsight refers to this as an Astrometric Solution. Once solved, another PixInsight tool was used to annotate the image (see What is it? below to see the annotated image). There it was Asteroid 8 Flora. I was very excited at this point! 

The insert shows the streaked smudge indicating an object that caught my attention. The small rectangle indicates the actual position in the image and the larger rectangle (inset is this area with 2X zoom).

A close up of the area in the insert. 

Now that the asteroid was confirmed and identified, I wanted to see how much it moved over the course of the imaging session. I opened the first and last individual subframes (subs) from the imaging session, Image 001 and Image 130 (images 130 to 150 were in the trees and were not useful). The first image was captured at 9:25 PM and the last usable image was captured at 2:33 AM. This is a duration of 5 hours and 8 minutes. This includes the time used to take flats early in the session. Only 126 subs were used to process the image due to image quality issues. That's why the integration time for the image is only 4.2 hours. I did some processing on the individual images to make them look more presentable. BlurXTerminator was used to make the star shapes better, NoiseXTerminator was used to reduce the noise, and the stretch from the Screen Transfer function was applied with histogram Transformation to permanently stretch the images. The arrows were added with Cosmic Photons' Draw Annotation script. The arrows indicate the position of the asteroid.

Image 001, the first sub captured. The arrow indicates the position of asteroid 8 Flora.

Image 130, the last usable image captured. The arrow indicates the position of Asteroid 8 Flora.

Here's an animated GIF to help show the motion.:

An animated GIF showing the motion of Asteroid 8 Flora over the duration of the imaging session.

Processing:

All pre and post processing was performed in PixInsight. Pre-Processing: All subs were visually inspected with Blink and subs with issues were removed. All light Frames, Flats, Darks and Dark flats were loaded into WBPP. Linear Post Processing: Background extraction was performed with GraXpert followed by BXT (correct only). SPCC was used for Color Calibration followed by a full application of BXT. The Stars were removed using StarXT. Starless Linear: Noise was reduced with NXT. The image was made non-linear with HT. Starless Non-linear Post Processing: Saturation and intensity were increased with CT. Exponential Transformation was used to increase intensity. The Create HDR Image script was used to compress the core of the galaxies (mask was used). The Image Blend script was used (with high pass filter) to increase sharpness. Stars Linear: The Stars image was made non-linear with Seti Astro's Star Stretch script. Stars Non-Linear: Saturation was increased with CT. Starless: Intensity, and contrast were adjusted with various applications of CT. The Stars and Starless images were combined with Pixel Math to produce the final image. 

What is it?

The Leo Triplet is also known as the M66 Group. It is a group of three galaxies in the constellation of Leo. The three galaxies that comprise the group are: M65, M66, & NGC 3628. NGC 3628 is also known as The Hamburger Galaxy. A faint tidal tale can be seen emanating from the lower righthand portion of NGC 3628. There are many more galaxies in this image, feel free to zoom in and look for tiny faint fuzzies.

Asteroid 8 Flora is in this field. It is a large, bright main-belt asteroid.

An annotated version of the image. Note asteroid 8 Flora is located in the lower left of the image.

How Big is it?

  • M65 has a size of 9.8 x 2.9 arcminutes (1 degree is 60 arcminutes) on the night sky and is about 117,100 light-years in diameter. 
  • M66 has a size of 9.1 x 4.1 arcminutes (1 degree is 60 arcminutes) on the night sky and is about 86,400 light-years in diameter. 
  • NGC 3628 has a size of 13.1 x 3.1 arcminutes (1 degree is 60 arcminutes) on the night sky and is about 140,400 light-years in diameter. 
  • Asteroid 8 Flora has an apparent size of 0.1 arcseconds and is 136 km in diameter.

How Far is it?

  • M65 is located about 41 million light-years (ly) from Earth in the constellation Leo.
  • M66 is located about 33 million light-years (ly) from Earth in the constellation Leo.
  • NGC 3628 is located about 37 million light-years (ly) from Earth in the constellation Leo.
  • Asteroid 8 Flora is 1.688 AU from Earth or about 14.04 light -minutes. One Astronomical Unit (AU) is the average distance to the Sun (93 million miles). 

How to find it?

The Leo Triplet is an excellent target for visual observation or astrophotography. To find it the it: first find the constellation Leo which is very well placed in the sky during the spring in the Northern Hemisphere. find "the Sickle" or "Backwards Question Mark", which is the front of the lion. The bright star Regulus is the handle of "the Sickle". Then find the slightly less bright star Denebola which is the tail of the lion. Moving in the direction of regulus, Chertan or Theta Leonis, is the next brightest star. It marks the hind quarters. Now move roughly in the direction of Virgo to find Iota Leonis, the lion's back leg. The Leo Triplet is about halfway between Chertan and Iota Leonis but slightly "off-line" in the direction of Denebola.

A finder chart for the Leo Triplet.

Image Details:

Capture Date: 04/22/2025
Location: Eden, NY
Telescope: Askr FRA600 (no reducer)
Camera: ZWO ASI2600MC Pro
Filter: none
Mount: Sky-Watcher USA EQ6-R Pro
Exposure: 126 exposures at 120 sec / Gain 100 / Offset 50 / -10°C each for a total exposure of  4.2 hours.
Software: NINA, SharpCap Pro, PHD2, and PixInsight


Clear Skies!
Ernie


Saturday, April 19, 2025

Building a “Super” Wide-Field Imaging Rig.

Super Sizing my Field of View ...

I have been thinking about and planning my next Astrophotography acquisition for many months. At the end of last year, I made the decision build a “super” wide-field imaging rig. The initial purchase for this project was the telescope, an Askar FMA180 Pro. In addition to the telescope, I also purchased the Askar EAF kit for the FMA180 Pro, Player One Ceres-C Guide Camera, and SvBony 30 mm f/4 Guide Scope. I purchased both items from Astroworld Telescopes around the holidays. Astroworld is a new retailer for astronomy related equipment with a strong focus on astrophotography gear. The company was started around NEAF 2023 by Daniel Higgins. Dan is an astrophotographer himself and in my opinion, he truly provides excellent customer service. The plan is to pair Askar FMA180 Pro with my ZWO  ASI2600MC Pro (APS-C) One Shot Color (OSC) camera. Wait!!! Let me back up for a minute and get into why I'm heading down this path.


Why Build a “Super” Wide-Field Rig:

My current primary imaging rig is already somewhat wide-field. I use an Explore Scientific Essential Series ED80 Triplet Refractor with my ZWO ASI2600MC Pro camera. This telescope has an aperture of 80 mm, a focal length of 480 mm, and is f/6.  It is an entry level scope as far as quality goes, it has served me well but long-term plan is to upgrade and use this for visual observer. The 80 mm refractor will make a nice compliment to my 8" Dobsonian. 

This 80 mm refactor has been perfect for many targets (Orion Nebula, Western Veil Nebula, Eastern Veil Nebula, and many others. The next piece of equipment in my collection that has a wider-field of view (FOV) is my 50 mm lens (the Nifty Fifty) for my DSLR. This is quite a gap and has proven to be a limitation, especially when bright comets with long tails are visible, as was the case this past October. Additionally, I live in Western New York (WNY), not far from Buffalo, NY. The weather here is persistently cloudy, primarily due to our position relative to Lake Erie. Also, I'm very active in our local astronomy club's (Buffalo Astronomical Association) outreach activities, which results in losing some nights to outreach events. Factoring in life's other obligations, I get about one night of imaging a month (on average). This creates a real obstacle for going after mosaics to capture larger objects (entire Cygnus Loop, Heart & Soul nebulae together, etc...). 

I was looking for telescopes/camera lenses in the 135 mm to 200 mm focal length range. I narrowed my choices down to the Rokinon 135 mm lens and the Askar FMA180 pro. An astronomy pal has let me use his Askar FRA600 telescope while he recovers from shoulder surgery. I'm really impressed with the quality of the optics and the overall quality of the scope. Feedback on the Askar FMA180 pro from other members of my local club and members of the AstroworldTV Discord community helped me come to the decision to go with the Askar. I want to be clear; feedback was positive on the Rokinon lens was positive too. Overall, the Askar won out in my brain. The combination of the Askar FMA180 Pro and the APS-C sized sensor of my ZWO ASI2600MC Pro camera will give me a FOV of about 7.5 degrees by 5 degrees. Here are a few screenshots from the website Telescopius.com Telescope Simulator tool showing how some popular objects will be framed with this setup.


Equipment Needed for the Build:

The Telescope: Askar FMA180 Pro. 

  • An apochromatic sextuplet refractor 
  • 40 mm aperture
  • 180 mm Focal Length
  • f/4.5 Focal Ratio
  • New Purchase (Astroworld Telescopes)


Imaging Camera: ZWO ASI2600MC Pro

  • APS-C sensor (IMX 571)
  • color
  • 3.76 um pixels
  • integrated USB 2.0 Hub
  • USB 3.0
  • Shared with existing rig


Guide Camera: Player One Ceres-C

  • IMX 224
  • Color (a mono camera would be more sensitive, color is fine for this rig)
  • 3.75 um pixels
  • New Purchase (Astroworld Telescopes)


Guide Scope: SvBony 30 mm f/4 Guide Scope

  • 30 mm aperture
  • 120 mm Focal length
  • f/4
  • Helical Focuser
  • New Purchase (Astroworld Telescopes)


Other Items/Accessories:

  • Askar EAF Kit for the FMA180 Pro (New Purchase - Astroworld Telescopes)
  • ZWO EAF (shared with existing rig)
  • Pegasus Astro Powerbox Advance (shared with existing rig)
  • ZWO Filter holder (shared with existing rig)
  • Dew Strips 
  • Losmandy Style Rail to mount everything on 

Future Items:

  • Apache Case
  • Dedicated Pegasus Astro pocket Powerbox Advanced
  • Mini PC

Build Status and Next Steps:

The rig is pretty much ready to go. I need to attach the Pegasus Powerbox (currently on my main imaging rig). I will share my imaging camera and the powerbox between the two rigs until I can afford to buy another powerbox (1st priority) and camera. I haven't had first light yet. That probably won't happen until late May / Early June. We are currently in galaxy season, as I write this in mid-April of 2025. I will use the FRA600 or our astronomy club's Celeston 14" Edge HD to image if any opportunities arise. They will be better suited for galaxies and my friend's shoulder will heal and he will want the FRA600 back. Looking forward to a super wide-field take on Nebula Season this year!

Clear Skies!
Ernie


Saturday, April 5, 2025

Aurora March 21st from the BMO

 An unexpected surprise ...

Friday night March 21st was intended to be one of our club’s Messier Marathon nights. Due to the forecast for clouds after 11 pm and poor sky conditions, the organizers decided to postpone. Although I disagreed with this call, as a person responsible for multiple astronomy related events per year, I respect the difficulty in making this call. Our club’s observatory director and I decided to head out to the observatory anyway. Our plan was to work on correcting sensor tilt with a new camera that is intended to be used with our Tele Vue NP101is. Imagine the telescope presents an image to the sensor in the form of a circle. If the plane of this circle is not aligned with the plane of the sensor, stars will be elongated in parts of the resulting image. Since the skies weren’t great, it was good use of the time to perform this tedious work. One of the participants of the Messier Marathon decided to come out anyway and visually observed for a few hours.

After successfully improving the sensor tilt of the telescope/camera system, I checked my phone and saw reports of Aurora in our area. It was a little before 11 pm. We went outside and faint Aurora were indeed detectable (by camera only). The display would ebb and flow, ultimately, we decided to pack it in and head home for the evening (it was a very long and tiring week). This is a single photo from my iPhone. The iPhone was mounted on a fixed tripod. My red headlamp illuminated the Sky Shed Pod and the Main Observatory structure. No additional processing, other than what processing the phone automatically performs, was done to the image.

Aurora captured from the BMO on 3/21/2025. iPhone on a tripod.

Image Details:

Capture Date: 3/21/2025
Location: North Java, NY (Beaver Meadow Observatory)
Telescope: N/A
Camera: iPhone 13 pro
Filter: N/A
Mount: Tripod
Exposure: 7.5 sec @ ISO 1250 26 mm f/1.5
Software: N/A


Clear Skies!
Ernie

Saturday, March 22, 2025

March 14, 2025 Lunar Eclipse

 I know, I know, it has been a while ...

It has been several months since I've posted. The weather this winter has been horrible. Hopefully, things seem to be improving here in March. Fingers crossed!

The night of Thursday March 13th into the early morning of Friday March 14th (Pi Day) was a total lunar Eclipse visible in the Americas. Fortunately (and surprisingly too) it was clear. Unfortunately, it was also a work night, and I didn't want to ask for the day off. I decided to put together a simple setup and just try to capture the total portion of the eclipse. When I got home from work Thursday, I set up my Explore Scientific ED80 Triplet Refractor on a fixed tripod with a large pan and tilt mount. I connected my canon t6i Ha modified DSLR to the scope and set everything outside (batteries were inside in the warmth of the house). I set my alarm for 2:30 AM and went to sleep after finishing a work meeting with colleagues from another country. My alarm went off, I got dressed and went outside. Moved my setup to the drive so I wasn't shooting over the house. Found the Moon, got focus, and took about 20 or 30 shots at various settings. The skies were really clear and the Moon, now completely in the Earth's umbra, was noticeably reddish in color, much more so than the last lunar Eclipse I was able to witness back in May of 2022. Feeling confident I captured "good enough" photos, I brought everything inside and tried to get back to sleep (no easy task after being in the cold crisp air for a little over a half an hour).

This is the result. I brought the photo into PixInsight and did do some BlurXTerminator to tighten up the stars and Noise Reduction. I had to keep exposure times short since I wasn't tracking. Taking longer exposures would have brought out more stars, and I could have made a nice composite. However, since I wasn't tracking, the stars would have been elongated. Overall, I'm satisfied. I would have been great to capture the whole eclipse using my imaging setup, but that wasn't possible for me this time. 


March 14, 2025, Lunar Eclipse from Eden, NY

Image Details:

Capture Date: 3/14/2025
Location: Eden, NY
Telescope: Explore Scientific Essential Series ED80 Triplet Refractor
Camera: Canon T6i (Ha Mod)
Filter: N/A
Mount: Pan & Tilt Mount on a tripod (no tracking)
Exposure: 0.5 sec @ ISO 1600
Software: PixInsight


Clear Skies!
Ernie


Follow

First Light with the Askar FMA180 Pro

 It was a good night to shake down a new setup ... The forecast for Saturday night 5/10 was for intermittent clouds early on and clear skies...